Bad property photos don’t just look amateur, they also impact sales. In fact, listings with high-quality images sell 32% faster than those with low-quality visuals. And in a competitive housing market where buyers scroll through dozens of listings in minutes, your photos are your first (and maybe only) chance to make a good impression.
Your real estate listing doesn’t just need to be in a good area but the photos should also have good lighting, angles and detailing. In real estate photography, mistakes are easy to spot and simple to fix once you know what to look for. So whether you’re a homeowner taking your own listing shots or an agent working with a pro, this guide breaks down the biggest photo mistakes (and how to fix them) in 2026.
We’ve teamed up with industry pros, from interior stylists to photographers, to help you spot the difference between “That’s nice” and “We need to book a viewing.”
| Meet the Experts The professionals behind the advice, angles and expert eye: Laurence Grant – Photography specialists at My Photos Forever Catherine Hayes – Staging Consultant at Pinkerton Real Estate Samira Lowe – Interior Stylist specialising in home prep for photos |
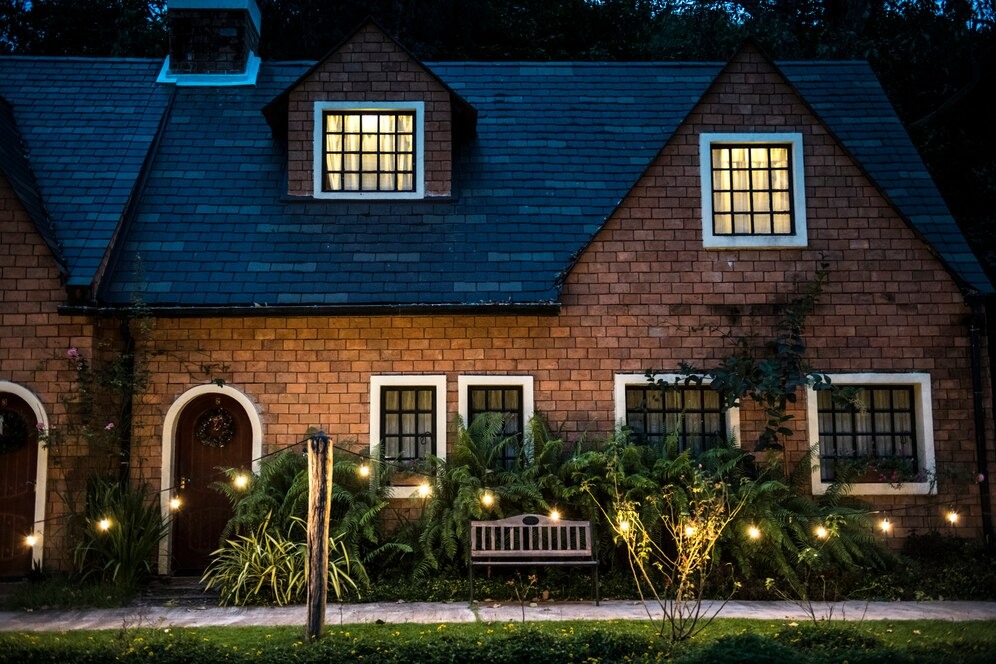
Mistake # 1: Ignoring Lighting
It’s the number one culprit in underwhelming photos. Harsh sunlight, dull afternoons, or just not paying attention to where the windows are – all play a role in making a well crafted photograph.
“Even great staging can fall flat if the photography misses the mark,” says expert from My Photos Forever. “We focus on light and flow – the stuff that makes buyers imagine living there.”
How to Fix-it
Schedule the shoot for late morning or early afternoon when the light is soft but bright. Avoid direct sun that creates glare and turn off ceiling lights to avoid clashing with studio lights.
Bonus tip: Clean your windows. Smudges and grime will show up more than you think.
| Amateur | Professional |
Mistake # 2: Skipping Rooms or Hiding Problem Spaces
You might think skipping the utility room or box bedroom is harmless. But buyers notice when something’s missing and they fill in the gaps with worst-case scenarios.
“Leaving out rooms like box bedrooms or en-suites just creates doubt,” says Samira Lowe, interior stylist. “If it becomes too expensive to stage all the bedrooms, add a good quality photo of the room to give the buyer an idea of the size and layout of the room.”
How to Fix-it
Photograph every room, even small or awkward spaces. If it’s not a selling feature, show how it can be used practically like a home office corner, a hallway storage zone, or even a neat under-stairs cupboard adds value.
Mistake # 3: Staging That Doesn’t Translate to Camera
You’ve plumped the cushions and laid out a breakfast tray, but something still feels off in the photos. That’s often because what looks good in person doesn’t always work on screen.
“Rooms can feel warm in person but look chaotic on camera,” says Catherine Hayes, Staging Consultant at Pinkerton Real Estate. “It’s about creating space for the eye to rest, not overstuffing corners with cushions and baskets.”
How to Fix-it
Stick to a neutral base and limit styling items to one or two per surface. Think tidy bedside tables, clean coffee tables and calm colour palettes. Remove overly personal or bold décor like busy rugs, personal photo frames or bright bedding.
Mistake # 4: Using a Lens That Distorts the Room
A wide-angle lens can make small spaces look bigger but used badly, it can also make them look warped. Ever seen a photo where the walls seem to curve, or the room feels stretched like a funhouse? That’s the lens talking. Wide-angle lenses are great until they stretch your lounge into a bowling alley. It makes buyers question what’s real.
How to Fix-it:
Use a moderate wide lens (16-24mm on a full-frame camera) and avoid any “fish-eye” effects. Keep the camera level and the vertical lines straight — crooked door frames are a dead giveaway.
Mistake # 5: Shooting from the Wrong Angle or Height
You’ve got the right room and the right light, but your shots still look awkward. It could be your angle. Too high, and the room feels squashed. Too low, and furniture looks huge.
“Photos taken from hip-height or odd corners just feel off,” says Samira Lowe, “You lose the shape of the room and any sense of style.”
How to Fix-it
Shoot from chest height (around 4.5–5 feet off the floor). Position yourself opposite a key feature – a window, a fireplace, or the room’s entrance; and keep the lines of the floor and ceiling level.
Bonus tip: Avoid shooting into mirrors. Nothing ruins a listing faster than the sight of the photographer crouched in the corner.
Mistake # 6: Overediting or Misleading Edits
A little polish is fine. But digitally adding sunlight, removing clutter, or painting over damp patches can cross the line from flattering to misleading. Buyers notice when the property doesn’t match the photos and it damages trust.
“Overediting isn’t just about aesthetics, it can breach material disclosure rules if buyers feel misled,” notes Laurence Grant.
How to Fix-it
Edit with a light touch. Adjust brightness, colour balance and contrast, but don’t erase reality. Keep colours true to life and features accurate. If there’s a flaw you’re hiding, fix it in real life, not in Photoshop.
Final Photo-Ready Checklist
Before the camera’s out, make sure your space is set up to shine. Here’s a quick checklist:
- Open all curtains, blinds and clean windows
- Hide wires, chargers and extension cords
- Remove bins, pet bowls, and laundry
- Clear personal items like photos, fridge magnets, shoes and coats
- Fluff cushions, straighten rugs and steam bedsheets
- Light candles or lamps for warmth
- Snap a few test shots on your phone to catch sneaky clutter
Final Thoughts
Great real estate photos don’t just show your home, they sell it. And in 2026, with most buyers making their shortlist before ever booking a viewing, those images matter more than ever.
The difference between “no viewings” and “five back-to-back” could come down to something as simple as shooting angle or lighting. By avoiding these six common photo mistakes, you’ll give your property the best chance to stand out in a crowded market.
Ready to impress potential tenants? Our guide on staging your rental property will help you create a warm and welcoming space.
